The Fat Ewe Farm and Bed and Breakfast
The Fat Ewe Farm and Moose Hills Inn
Organic Permaculture Farmin' for
the Lazy Ewes
  • The Fat Ewe Farm
  • About Us
  • Blog
  • The Fat Ewe Farm Store
  • Livestock Breeds (click here to see all the breeds)
    • Angora goats
    • Icelandic Sheep
    • Jacob sheep
    • Old English Southdown Babydoll Sheep >
      • Babydoll Sheep on the Fat Ewe Farm
  • Contact Us
    • Photo Gallery (click here for some awesome photos or watch the slideshow) >
      • Video Slide Show
    • Phone Number
    • Map
  • Sale Barn
  • Recipes From the Fat Ewe
    • Old Stuff
  • How Much Meat Do You Get?
  • Ukrainian Easter Eggs
  • Moose Hills Inn

Saying Goodbye

9/29/2015

4 Comments

 
The time comes when taking a breath steals the air instead of filling the lungs. That last breath, the one when the soul is ready to kiss the beloved body goodbye; it comes too soon. 

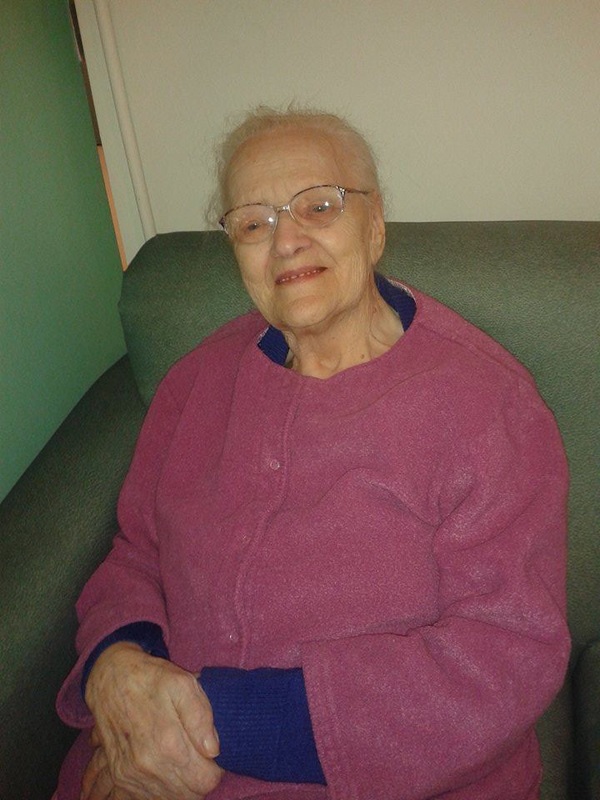
My mother is 90 and she is dying. She finds no pleasure in food and only wants to sleep, that long and lasting sleep of peace. I visited her to say good bye. I told her I love her and that I was grateful for her chosing me as her daughter and for being my mother. I told her I forgive her for not knowing how to show me that she loved me, and for not coming to my graduation or the many events where I was awarded something special. I tried hard to win her attention and her love, though it seemed just putting her arm around me was more than she could muster and saying I love you just never crossed her lips. While she readily says thank you to the staff in the care facility, when I cared for her for 10 years, she just did not say that to me. I told her I forgive her and I did. 

Instead I held her hand for the last time. I saw the attempt of a smile for the last time. Never again will I hear her laughter, or sit in her presence. I was there to put my arms around her and hold her, to hug her and tell her I love her. Of course I do. She is my mother, the one who bore me, who babysat my kids, who listened to my woes and who made Christmas dinner, at least until I took over that task for her. Then I made her dinners and cared for her. I went home at lunch to make sure she ate and took her medication and I was home by 8 every night to put her to bed. Those were some hard days, especially when her health began to fail. There were too many ambulance trips and too many scares, yet I continued until finally, she was not home one day. She went down the alley to pick black berries, not far, but I became distraught, called the police and went hunting for her. What if she had fallen? Where was she? I was burned out. I put her in the home and she was very upset with me. Then I left. I went to Alberta and left her there. 

She has dementia, likely helped along from the stroke she had years back. She did not know who I was this time. That hurt. She was already gone. 

I stayed with her several hours at least a couple of times a day when I was there to see her, to say good bye. I sat beside her while she slept in her chair, her pale face resting on her hand and leaning on the arm rest. She was quiet, peaceful. She did not eat. The last day, I sang hymns beside her and it ocurred to me that I will never sing with her again. She loved to sing, but she was sleeping. I cried. 

Soon that time will come when the breath she takes will steal her air instead of give her life. Soon she will sleep and not wake. I said goodbye, the hardest good bye I will ever have to say. My mother is dying and I will never see her again. I told her I love her, I kissed her forhead and I left her in her chair, asleep. She did not know I was there or I was gone, but I did. Good bye Mom. I love you. Good bye. 
Picture
4 Comments

More Furniture

9/22/2015

0 Comments

 
Picture
this was a plain maple 1960's desk in good shape. Like most maple furniture, it had no character. I painted it and drybrushed blue over top. It was better, but not good.
Picture
so this is the latest version of the plain 1950's maple desk. better again
During my 61 years, I have refinished a whole lot of furniture, painted some and even built and upholstered some. I took level 1 and 2 of upholstery so I would know the basics, but hoisting furniture and stripping the upholstery off, and then stretching and stapling new fabric is darn hard physical work. I built an upholstered chest from scratch and have done several ottomans and even some armchairs. There were whole dining room suites, stripped down to the bare wood and then painstakingly restored, too. I remember the carved 1800's oak suite all too well. In order to get the 17 layers of stain and shellac out of those intricately carved corners and crevices, I used a piece of ebony cloth on the tip of a screwdriver and sanding the round sections of the legs was another challenge. I must have enjoyed the work or I certainly would not have done it twice over. 

But I am back at it again, as it has become fashionable to play with real wood furniture once again. This desk was a 1960's desk, very similar to the dresser I had as a girl that I stripped, sanded and refinished in my teens. Instead of stripping it and adding some colour to the bare wood, I decided to paint it. Paint is removable, and since this is just latex, it is easy to remove should some one down the line want to restore the maple. They always do. 

First I painted the desk after a very light sanding to help the paint adhere, then I drybrushed a lovely pale blue here and there for interest. This desk held the soap in my store all summer, the drawers opened and brimming over with the tantalizing soaps. But now, with winter approaching, the soap and essential oils and linens must come inside, so the desk sat empty. I sold the desk I had been using for a computer desk and this was going to be the new model, but not white and blue. I put it in the room just in case I changed my mind about adding to it, and decided to wax it with black wax. The black wax is hard to use, messy and inconsistent. It can be polished almost right off while still wet, but once dry, it forms a stable hard coat that is easy to strip when the time comes. I did not remove the handles to wax it to give it a more authentic 'used' appearance. For the computer desk it will be just great, since the monitor is a 27 inch flat screen imac and does not need much depth. The room is the second bedroom of the little farmhouse, which also will double as a very occasional guest room and laundry room. 

I bought foam for the seats of the table and chairs I am working on, but had to buy a sheet of foam and will have to cut it to the seat cushion size. That is all I could get in this town. I will do that when I get back. 

Tomorrow I am off for a week to White Rock to visit my mother, who is 90 and has been very unwell. I feel this may be the last visit with her. See you when I get back. 
0 Comments

September 21st, 2015

9/21/2015

0 Comments

 
This is the next in the table and chairs series. 

The chairs took much time to prepare. First, the webbing had to be removed. Each end of the webbing had 5-10 staples in it. The chair webbing was apparently done by two different people because one person was meticulous about the placement of exactly 6 staples per side, while the other was haphazard and did not always have the same number of staples either. But, both persons hammered the staples flat after putting the webbing on. I guess they thought they would never have to take it off and wanted it to stay put. 

I tried a knife first to slip under the staples and lift them, but it was not a good choice of tool. So, I tried a chisel screwdriver, but it was too thick and the third try, a thinner model of chisel screwdriver worked well. Still, it took some strength and elbow grease to remove those staples. Some broke off because they were actually shattered wtih the hammer, though since they were not stressed, they remained in tact until removed. The shattered staples came off with the webbing. The screwdriver was able to lift the staples but not remove them. I found an old tool that was my father's . I have no idea what that tool is really intended for. It has sharpenable pinchers and a handle that can pinch the hand if not held carefully, but the implement worked extremely well. If too much pressure was applied, the staple was cut, but just a little, just enough to grab and hold the staple and it came right out. Each chair had an average of 72 staples!

There are two chairs with the small nails from a previous seat that are quite embedded and old. I left them in and created a pattern for the upholstery that covers them. I have not been able to find seat foam, hopefully organic latex, anywhere in Alberta. It appears I will have to order some from BC, possibly where I got the organic latex rubber foam for the motorhome. They were fast, effecient and the price was reasonable, that is, if the company is still there. 

I had hoped to do a seond coat of the stain finish today, but ended up packing more of the kitchen things that I just unpacked in the kitchen to move back to the farmhouse. Oy! 

It will likely be a few days before I get a chance to upholster the seat pads, but I might be able to get the next two coats of stain finish on by then and cut the plywood seat boards out. I bought some new jig saw blades and plywood today, however; it was raining most of the day, again, so I did not attempt to cut them out. I did cut a pattern out, 12 inches wide at the back and 13 and a half at the front to follow the contour of the seat. The foam should be cut this size as well, and I rounded the corners for esthetics. It is a good thing I took the two upholstery courses! This set, the table and six chairs, will be a thing of beauty when it is done. I promise!
Picture
This is the webbing style of person A with exactly 6 staples , 3 in each row.
Picture
This webbing was done by person B. There is no real order and the number of staples per strap varies.
Picture
One big pile of broken, rusty old staples, plus an equal amount still half attached to the webbing. That is a lot of pulling!
Picture
This is my father's old tool that I used to pull out the staples. I am not sure what it was originally designed or intended for, but it worked very well for this application.
0 Comments

The Table is Progressing

9/20/2015

0 Comments

 
Picture
The missing veneer on the sides just adds to the character of this charming table. Now that it is stained and sanded, it is lovely.
Picture
The chairs turned out exquisitely! With some nice brown leather, they will be amazing.
I am so pleased I chose not to paint this beautiful table and chairs. I am going to write the story of the table and chairs one day soon, my own imaginary version of who sat on them and where they have been. As I was working on them, I noticed little nicks here and there, bangs, bruises, bits of left over green and white paint, and breaks that had been repaired. If only chairs could talk! I am sure the real story of who sat on these chairs and used this table is very interesting. 

I finished sanding and then put on the first coat of Bioshield Walnut oil stain and finish. It has enough colour, but I think I will do one or two more coats. After the next I will assess it. I do not have to put a clear coat on, since the product is a finish as well as a colour, but to make things more durable a coat of very hard clear finish will likely add life to the group. If I do not clear coat it, the items can be recoated with the walnut colour oil stain as required. So, I will have to see how it looks when I think I am done and decide if the clear coat is the best choice then. 

There are two leaves with the table that are solid oak. It makes me wonder if some one at some time decided to put the veneer on an oak table, but that would seem redundant so who can say. I got a jig saw by chance from a sort of garage sale for a whole $5. It was sitting there and I asked the lady how much. She never used it, did not know how and said $10. I offered her the $5 and she agreed, so now I have a jig saw to cut the plywood for the seats. Yay! 

I already love this table and chairs. For the next 4 years while I am here, it will serve me well and I will honour it and  enjoy it and the history I think it has. Old things are so much more interesting than new, don't you agree?
0 Comments

My 'New' Table and Chairs

9/19/2015

0 Comments

 
Because I was moving into the big house, I sold the chairs from the little farmhouse. The table was an antique card table that folds up like a butterfly, and it is downstairs in the big house for now. It was never really large enough anyhow. I bought this table here last year, in pretty bad shape, mostly because it is veneer and has not been cared for. The veneer has lifted. One of the legs was broken right off at some time. It makes me wonder how that could happen, because it is solid wood under the quarter sawn oak veneer. It must have fallen off a truck or something equally trajic. The chairs came with me from White Rock, orignially with another table, long since sold. I always loved the shape of the chairs, but they too, had seen better days. Somewhere in their lives, they were painted green , but previous to that, white. They had been stripped quite well when I bought them, however; they put webbing on the seats for some reason. That is not how to upholster these chairs. There would have been a plywood cutout that had leather tucked around the bottom of the plywood, which then would have been nailed to the chairs. During their lifetime, they had been hobnailed, likely with leather and also tacked with somethiing else. Now they are criss cross webbed with a zillion staples in the wood. That will take some time to remove. 

At first, I planned to paint the table for sure, because it was so rough, but I think I will try to restain it. The bottom would have to be stripped before accepting stain, though, because it appears after its mishap and broken leg, someone also varnished just the bottom. So I will stain and varnish what will accept the stain and assess the appearance. If it is really terrible, I will paint it, but t seems such a shame. The chairs will be fine stained and varnished. I have a ton of Bioshield wood finishes to choose from and will use a highly durable one, such as the floor finish. This may be the last life for these pieces, though if I take care of them, perhaps they will last another 100 years. I suspect the chairs are from the 1930s, possibly the 40's, but the table is newer made to look old. Now, with all its injuries and repairs, it does look old again. 

The set of 5 chairs, one Captain's chair with arms and the table with two leaves will be my new kitchen set and it will fit beautifully in my little farmhouse. Just a few more days of work, one to remove the staples, and two to stain, then three to varnish or clear coat with the organic Bioshield product and I will have a new kitchen table and chairs, and one that I love to boot. It is going to be so pretty.
Picture
The veneer was off in quite a few places along the edges and it was in rough shape.
Picture
But the table is solid wood, and the leaves are solid oak, which make me wonder if they even came from this table at all, though they do fit. You can see the mark where the bottom right leg was broken and glued back on.
Picture
The chairs will take some time to strip the webbing off. They have been sanded down and some one else stripped them prior to that. They should turn out magnificently.
Picture
The mark on the right is the worst where the veneer had chipped off the side and the top. This has been well sanded now and will simply have to be part of "the well worn and weathered' look. I think.
0 Comments

The Downside of Using Hay Nets

9/18/2015

1 Comment

 
When viewing hay net usage, the end of the hay looks like a little pile of dry straw and the net crumpled around it. Well, shep and goats have different feeding habits and now I know that there never will be just a little pile of dry straw around a crumpled net. The animals climb on top of the netted bale and eat down, unlike horses, for which the nets were designed. Of course they do not climb on top and neither do cows, but sheep and goats do, so at the end of the bale, there is quite a bit hay rotting under a lot of manure and everything is wet and gross. 

But, for sure there is a saving in the hay because when the sheep and goats have free access, even from a feeder, they pull out and drop a lot of hay which is wasted. More than half of the hay is not eaten since when it falls to the ground it is considered dirty and they don't touch it. It is sort of nature's way of protecting the runimants from eating fences, also on the ground, which would cause an uprise in worms that could possibly be fatal. So the sheep instinctively do not eat off the ground .

But, the hay in the net that is left has been trampled, pooped and peed on, especially around the edges, and is very disgusting to clean up. I tried to fork it out of the net, and the weight of the wet hay and stench caused me to use the trusty skid steer instead. I picked the net up on a fork and the spoiled hay made its way to the ground while the net was suspended with a little shaking of the forks. I wore good leather gloves that got soiled very quickly, but I don't enjoy handling stuff like that, not one bit. I wondered if I should hose the net down prior to installing it on the next bale, but in the dead of winter when it is 40 below, I won't be hosing it, so I didn't this time either. 

It took an hour and a half to clean the spoiled hay and I wondered how that would work when the net is frozen to the ground. Feeding from the net does keep the wool much cleaner since the animals are not pulling the hay over the backs of other animals as they eat. That was half the point and saving money by not wasting hay was the other. Pen cleaning should also be half the work in the spring, but time will tell. Finally, after an hour and a half of work and cutting the twines off the newly installed bale, I laid it on its side and left it for the sheep. They are still out on pasture, but there is not much there for them anymore, so this new fresh bale of hay will be welcome. I have not seen them eating from it yet. The last bale was 600 pounds and this one is 1500 pounds. It should last the ten rams several months and the good thing is they won't climb on top of it just yet because it is rather high. The goats will, but the sheep are  unlikely to. Realizing that they poop and pee on the hay, I will have to watch very closely for elevated worm levels, which come from ingesting poop with worm eggs in it. 

So, basically, the gross mess and clean up is a big down side to the hay nets, but I feel they are going to pay for themselves in a year with the conservation of hay, the reduced clean up and the clean wool, so I think they are worth the big investment at this point. 
Picture
the crumpled gross mess of spoiled hay and manure wrapped in the net.
Picture
a closer peek at the manure stuck to the string which I have to use to open the net. Gross
Picture
the net lifted a little so you can see the amount of manure and spoiled hay in the perimeter
Picture
the remains of the bale out of the net.
Picture
the sheep and goats tasting the new hay. the net is not really clean but they smell the frsh hay and are willing to eat through the net. whew. Otherwise I would have had to remove it, wash and replace the net.
1 Comment

Making Beeswax Furniture Polish

9/16/2015

0 Comments

 
Some time ago, people did not have the privilege of running to a store to buy what they needed or wanted. They learned to make things themselves and really be self sufficient. I have been working with some antique wood furniture, trying to decide whether to paint it or keep it original. It has value in the original state only if there are buyers for it. Otherwise, it is basically just old furniture taking up space. 

The old furniture was not finished with petroleum based products, but rather shellac, which is the resin secrete by  a bug on trees primarily in India and was once used in the final coat of furniture to seal and shine it. Thereafter, the pieces were polished wiht beeswax furniture polish or reshellaced. So, I learned how to make a simple beeswax polish. It is organic and easy and also not hard on the environment or the skin. I used some as hand cream today to test out my product and it was wonderful, quickly drying, but not caking on my hands, and providing a smooth silky finish which was water repellent. This is a barrier cream, but alas, it was not designed for hands. 

I plan to polish the antiques, I guess, not paint them, at least not yet. I cannot think of painting that lovely wood. Well, I do think of it, but it gets voted down in my little mind. To make the beeswax polish I used two ingredients: lime terpene, which is the solvent from cold pressed limes, yes, the fruit, and beeswax. The wax was cut in small bits about a centimetre square and a half centimeter thick. I put some in an emamel pot and poured the terpene over and stirred, then  left it over night. Over the next three days, I stirred and added more terpene. On the fourth day, the mixture was soft and smooth with no distinguishable lumps of beeswax, as the wax had dissolved into the terpene. The polish has a wonderful lingering but not overpowering lime scent too! 

The polish made a few jars and a tester, but I don't know how much I used of each ingredient. If you are going to try it, start by covering thte beeswax with terpene, then add more terpene as the wax softens until the consistency is what you think it should be. Not great directions, huh? But really, I don't think you can go wrong. Too thin, add more wax, too thick , add more terpene. By the way, the terpenes come from the distillation of the plants and there are mint, eucalyptus. clove, lemon, tangerine, orange and the lime. Mixes of two or three different terpenes are also possibilities. Would you like to try some?


Picture
0 Comments

Painting Stuff

9/15/2015

0 Comments

 
Picture
the lamp would not have been bad if it was left alone. Yeesh! that blue paint did nothing for it!
Picture
and the shade definitely was a poor match. but what do you want for $5?
Trends go in cycles, just like seasons and fashions. It was trendy in the 40's and early 50's to paint old furniture, mostly because people in the 40's were coming out of the hungry 30's depression and did not have money for new furniture. So, to create a new look, they painted things. Fortunately, the paint used in those days, was easy to strip off. I did a lot of the stripping of old painted furniture in my youth, uncovering the magnificent wood grains forsaken for a coat of green paint. If the wood is beautiful, such as quarter sawn oak or burled walnut, painting it seems a sacrilege. 

And so, today's trend is to paint not only furniture, but everything from crystal chandeliers to sofas made from cloth. Annie Sloan created a paint based on PVA, or white glue, chalk and pigment, offered it in only a few colours, and developed antiquing waxes that instantly created finishes which appear worm. The trouble is that when distressing newly painted items, some painters do not pay attention to where there actually would be marks and the piece ends up looking like a jug saw puzzle with scratches randomly planted. Not so good. 

I am also no stranger to painting and unique paint finishes. I have not yet tried the chalk paint that is glue based, but I did buy a little bit of latex with chalk in it, called Reloved, from a local store in our town. It is not a great paint, not much different than a latex paint, and likely could be achieved by throwing in a couple of tablespoons of fine chalk in a litre of paint. It was readily available and I thought I would give it a try. 

The lamp came from the local thrift shop. There are actually two. Some one had started to paint them blue, but never finished. The old ceramic lamp without the blue might have been quite acceptable, but the bothced blue paint had to go. I tried to get it off, and without a lot of work, which likely would have affected the under finish, it was not giving up its place. There came the new green chalk latex paint. The lamp shade was definitely not original and not a great choice for the lamp. Something had to be done with it too. 

So, I painted them both. This is the first coat of paint. I have not yet decided whether just to dark wax this now, which will be quite nice with all the grooves and deptressions in the lamp, or to use a metallic first over the green and then the dark wax. I will decide tomorrow in the light. The inside and outside of the shade were painted with a very diluted mix of the paint and water and the base was covered with the paint right out of the jar. No special brush was used, but they sell a simple stencil type of brush for $28 as an accessory with the paint if one was so inclined. It was not necessary. See, when the evenings are getting long, there is always a project to do!
Picture
So, there was a light whitewash under the warm silver metallic paint to lighten it a bit. I am debated whether to use a dark wax now or leave it as it is.
Picture
and darn again, the shade in this light is nowhere what it looks like now, a light sage green inside and out. Better photos in daylight.
Picture
I think it has won out without the dark wax over. For now that is. And yes, I know the kitchen is a disaster. I have been sorting two households out and have run out of room to put anything else away. So, until I move back to the other house, it is going to be like this. Sigh.
0 Comments

Selling Fleece

9/13/2015

0 Comments

 
When I began the fibre farm, it was my idea that the wool from the sheep would go to the mill and come back as yarn or clean batting. The mills are backed up and expensive and the wait is over a year, so that is not right. Also, the wool needs to be free of hay and debris for the processing to produce clean yarn without hay and straw bits in it. Who knew? 

So, the other option is to sell the fleece. I thought this would be easy, people would be lined up at my door to buy these exotic sheep fleeces and that would be that. No, wrong again. There are only two handspinners here. Now, knowing what I do about this area, that is not surprising, but it is yet another consideration that I did not consider. Like minded people in an area with other like minded people is what I should have looked for. Instead I am in a red neck area that loves the things I despise. They do not wear wool or eat sheep. 

So, vending to folks away from here is the only option and that means shipping. It means I have to go to the post office, sometimes twice a day and for what? To send 4 ounces of wool to some one in another province. Yup. Not a whole fleece, but a trial bit and I don't blame them for this , but they want to know the exact shipping costs, so I have to get the costs by going to the post office, come back, tell them and then possibly fill the order and post it. The most I have sent is 1.5 pounds. Oh my goodness. 

There has to be another alternative, but I don't know what. I am willing to sell all the wool to some one who would come and get it. They can divide it into ounce portions and make a profit on it. The time consumed doing that is just too much. I recently sold some bamboo fibre (bamboo from when I had the green lifestyle store) for $5 and had to go twice  to the post office. The $5 I made went out the window in my time and gas. So, I am thinking it is better to sell the lot cheaper and go once to the post office and do what I enjoy doing instead. Hmmm, I think that is a prudent idea. Now, I happen to have about 40 fleeces to sell. Would you like one? A whole one? 
0 Comments

Little Bunnies

9/12/2015

0 Comments

 
The mamma rabbit ever only has three babies. Something internally must be wrong because she should have 8-12. She is a good mom, but heeping her as a breeding doe when she only has three bunnies is not feasible when other does will have more than twice as many. Unfortunately for her, her fate is a meat rabbit. 

But this is her second litter of babies only and possibly she deserves one more chance. She is protective of the little ones and their nest and she does all the right things. Maybe.

I can pick up the babies now, but they scream for a few seconds. Then they settle down, realizing I am not going to hurt them. The only time rabbits are picked up in nature is when a predator intends to eat them, so being lifted is very uncomfortable for them and they will try to avoid it at all costs. They are small still so now is the time to handle them and help them feel comfortable or they will bite and scratch possibly when they are adults. I don't have any biting rabbits, though a rabbit has very sharp claws and knows how to use them. Again, the only time they are handled is when they are prey and there is  a predator after them. It is instinct not to want to be touched. 

The little ones are adorable. They have fat round little bodies and short ears and hip hop funny, still getting their legs to do what their minds want to. Their movements are a little uncoodinated and jerky, and they are adorable to watch. Everyday, at leeast once, but more if I can, I pick them up and handle them. They still scream, but the time before they settle comfortably is becoming less long. Oh, darn, it is hard to think of them raosted at this stage. 
Picture
They have big fuzzy feet and tiny ears. Sooooo adorable.
Picture
This one screamed but settled quickly.
0 Comments
<<Previous

    Categories

    All
    Airstream Land Yacht 1964
    Alpacas
    Alpine Goats
    Ameraucana Chickens
    American Buff Geese
    Ancona Ducks
    Angora Goats
    Angora Goats
    Angora Rabbits.
    Babydoll Southdown Sheep
    Babydoll Southdown Sheep
    Bed And Breakfast
    Berkshire Pigs
    Blue Faced Leicester Sheep
    Blue Swedish Ducks
    Boer Goats
    Border Collie
    Border Collie
    Bronze Turkey Standard
    Bronze Turkey (Standard)
    Canadian Horses
    Canadian Horses
    Cats
    Chickens
    Cotswold Sheep
    Crafts And Hobbies
    Cream Legbar Chickens
    Dorset Sheep
    Ducks
    Embden Geese
    E'st A Laine Merino Sheep
    Farm Life
    Farm Life
    Farm Store
    Finnsheep
    Flemish Giant Rabbit
    Flowers
    French Lop Rabbit
    Galloway Cattles
    Gardening
    Gotland Sheep
    Guinea Fowl
    Herbs
    Holstein Steer
    Icelandic Sheep
    Jacob Sheep
    Japanese Bantam Chickens
    Jersey Cow
    Kahaki Campbell Ducks
    Karakul Sheep
    Kiko Goats
    Kilo Highland Cows
    Light Sussex Chicken
    Livestock Guardian Dogs
    Livestock Guardian Dogs
    Maremma Sheepdogs
    Maremma Sheepdogs
    Meishan Pigs
    Miniature Nigerian Dwarf Goats
    Moose Hills Inn
    Muscovy Ducks
    Norwegian Red Dairy Cow
    Nubian Goats
    Nygora Goat
    Ossabaw Hogs
    Partidge Chantecler Chickens
    Pekin Ducks
    Permaculture
    Pied Guinea Fowl
    Polish/Ameraucana Bantam Cross Chickens
    Polled Dorset Sheep
    Potbelly Pigs
    Pygmy Goats
    Recipes
    Rigit Galloway Cows.
    Romanov Sheep
    Romney Sheep
    Rouen Ducks
    Saddleback Pomeranican Geese
    Saxony Ducks
    Sebastopol Geese
    Sheep And Goats
    Shetland Sheep
    Silver Spangled Hamburg Chicken
    Soap And Hand Made Cosmetics
    Standard Jack Donkey
    Sustainability
    Swiss Blackneck Goats
    The Llamas
    The Llamas
    Toulouse Geese
    Tunis Sheep
    White Chantecler Chickens
    White Danish Geese
    Wool

    Author

    Fluffy writes daily about the experiences on the farm and with the bed and breakfast patrons. 

    Archives

    October 2020
    September 2019
    June 2019
    March 2019
    January 2019
    November 2018
    December 2017
    November 2017
    October 2017
    September 2017
    August 2017
    July 2017
    June 2017
    May 2017
    April 2017
    March 2017
    February 2017
    January 2017
    December 2016
    November 2016
    October 2016
    September 2016
    August 2016
    July 2016
    June 2016
    May 2016
    April 2016
    March 2016
    February 2016
    January 2016
    December 2015
    November 2015
    October 2015
    September 2015
    August 2015
    July 2015
    June 2015
    May 2015
    April 2015
    March 2015
    February 2015
    January 2015
    December 2014
    November 2014
    October 2014
    September 2014
    August 2014
    July 2014
    June 2014
    May 2014
    April 2014
    March 2014
    February 2014
    January 2014
    December 2013
    November 2013
    October 2013
    September 2013
    August 2013
    July 2013
    June 2013
    May 2013
    April 2013
    March 2013
    February 2013
    January 2013

    view old blog site

    RSS Feed

Contact Us
Home

The Fat Ewe Farm 

All text and photos are the sole property of The Fat Ewe Farm  and may not be used without written permission.